DIY: how to make a digital film cassette
photofacts.net | Apr 23rd 2011 11:42 PMLast week we wrote about a digital film cassette you can buy from an Etsy user. In the comments Vincent posted a link to a DIY tutorial to make your own. Inspired by the idea I bought myself a compact USB stick and decided to try it myself. Here you can find my own step-by-step tutorial on how to make your own USB film cassette!
The main reason for trying it myself was the offered capacity of the USB devices. 2 or 4 gigabyte is hardly enough nowadays. Why not make it a 16 gigabyte USB drive? USB Sticks are cheap, you can get a compact Sandisk USB stick for less than 20 Euros (or dollars). I opted for a 16 gigabyte Sandisk Cruzer Blade.
An important aspect to look at when buying a USB stick for this purpose is of course its physical size. It has to fit in a film cassette and therefore it has to be small. The Sandisk Cruzer Blade is just that; very small. I could even have been a bit longer, but it worked out just fine.
I found some old films lying around at home. Among them was an old Ilford black and white film. As the film cassette is something you'll be looking at and showing to others I decided to use this one; it has the best looks.
How To
Below you'll find the steps I did to create my own digital USB film cassette. To be honest, I did ruin two cassettes before I was happy with the end result. So don't start out with your best looking film cassette, but practice first on some other cassettes.
What you need
- Film cassette
- Compact USB stick (like the Sandisk Cruzer Blade)
- Corkscrew or bottle opener
- A pair of pliers
- A pair of scissors
- black tape
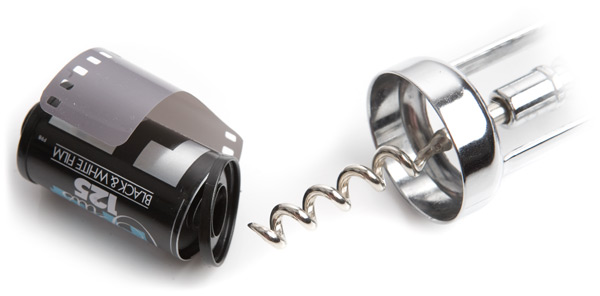
Step 1; remove the bottom
The first step is to remove the bottom of the cassette. The bottom is a metal plate that is clamped to the cassette. You can remove it by using the point of the corkscrew to gently pull the edges of the bottom plate. Pull several times on different locations to remove it without damaging it.
As soon as you've removed the bottom you can press on the top part that is sticking out. This way you're pushing all of the contents of the film cassette out. You'll be left with an empty shell. Keep the other parts too, you'll need them later.
Step 2; widen the hole
This is the most tricky part of the process. The hole that is left on the top of the cassette isn't big enough to fit an USB connector through it. You'll have to widen it, but be careful not to damage the rest of the top plate.
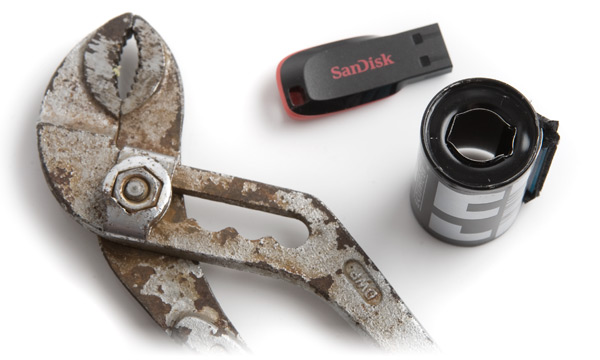
I've used a pair of pliers to do this. Make sure that it doesn't make a gap that is too big. Ideally it would be as thick as the USB connector is. Put the pair of pliers in the hole and gently create a gap without damaging the rest. It's wise to make a small gap on both sides so the USB drive will end up nicely in the middle.
Step 3; tape up the USB drive
The Sandisk USB drive I've used is black with red details. When you finish up the digital cassette, you'll notice the red parts when you look into the hole at the top of the cassette. Although not necessary, I'd recommend to do something about this.
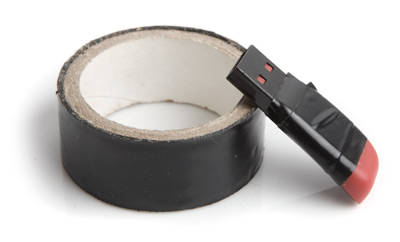
A simple solution is to use black tape to hide the red parts with. When you use black, you won't notice the USB drive that embed into the cassette. If you already have an USB drive that has a dark color, you can skip this step.
Step 4; putting it back
Insert the USB drive into the gap you've made by entering it through the open bottom end. Make sure there is enough of the USB connection part sticking out of the film cassette. You'll want to be able to use the drive also.
Remove the film from the plastic reel. You can use the film to make sure the USB drive will stay in its place. Wrap the film tightly around your finger and then put it back into the canister. If you want you can leave the start of the film out, it will be just like an unused film.
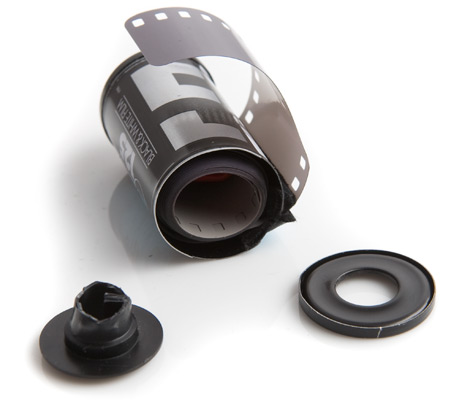
Step 5; putting the bottom back
When you've got everything back into the cassette, you can close it up. To finish it off, you can fill up the empty bit below the USB drive with the end of the reel.
Using a pair of scissors you can cut up the reel. Put it into the cassette and lock it with the metal bottom. It might take some work to get the bottom back on perfectly.
Original Page: http://www.photofacts.net/photography/topic/tutorials/diy_how_to_make_a_digital_film_cassette.asp
Shared from Read It Later
No comments:
Post a Comment